Fitting Guide

Threading Steps
Step
01
Start with taking some thread and tie a couple of knots so the thread is fixed in to the needle, this will prevent the thread coming out of the needle. Once this procedure is done you may now pierce through the last pre-stitched loop, the thread is now fixed

At this stage, pull the thread so the cover comes together, do not over pull the thread too much as this could leave crease marks, but just enough so it looks sturdy.

Step
05
Step
02
On the exact opposite side of the cover, again pierce the needle on the last pre-stitched loop.When both sides are done, you may tighten the thread, Every pre-stitched loop should be done roughly 6-12 loops, this just ensures the corners are more solid.

You may now proceed to thread the pre-stitched loops, missing one as you go along.

Step
06
Step
03
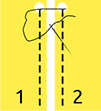
Sew through the pre-stitched loop from line 1

As you get towards the end of the section just double check you have not missed any loops and everything is secure, if the steering wrap has some creases you have done something wrong and need to sort this before the last step.

Step
07
Step
04
Cross over through pre-stitched loop from line 2

When you come to the last pre-stitched loop, you will have to go back between 3-6 pre-stitched loops just to make sure it is secure. You may now cut the thread,Please leave 3 inches of thread as excess, this may now be burnt and pressed, this process will secure it or alternatively make another knot and make sure it is hidden behind the wheel.

Step
08
Step
01
Start with taking some thread and tie a couple of knots so the thread is fixed in to the needle, this will prevent the thread coming out of the needle. Once this procedure is done you may now pierce through the last pre-stitched loop, the thread is now fixed

Step
02
On the exact opposite side of the cover, again pierce the needle on the last pre-stitched loop.When both sides are done, you may tighten the thread, Every pre-stitched loop should be done roughly 6-12 loops, this just ensures the corners are more solid.

Step
03
Sew through the pre-stitched loop from line 1

Step
04
Cross over through pre-stitched loop from line 2

Step
05
At this stage, pull the thread so the cover comes together, do not over pull the thread too much as this could leave crease marks, but just enough so it looks sturdy.

Step
06
You may now proceed to thread the pre-stitched loops, missing one as you go along.

Step
07
As you get towards the end of the section just double check you have not missed any loops and everything is secure, if the steering wrap has some creases you have done something wrong and need to sort this before the last step.

Step
08
When you come to the last pre-stitched loop, you will have to go back between 3-6 pre-stitched loops just to make sure it is secure. You may now cut the thread,Please leave 3 inches of thread as excess, this may now be burnt and pressed, this process will secure it or alternatively make another knot and make sure it is hidden behind the wheel.


